Rapid Threat Model Prototyping
Last year I had the opportunity to take part to one of Geoffrey Hill’s presentation about the Rapid Threat Model Prototyping (RTMP) methodology he designed. I find it incredibly useful, so I decided to share with you the core principles and steps. This document is based on the Rapid Threat Model Prototyping official document.
The RTMP is quite simply to apply: define the system design and the zones of trust, then use the STRIDE framework and Geoffrey Hill’s rules to find out what threats apply to your system and afterwards use OWASP Top 10 mapped to STRIDE to find out what vulnerabilities and related mitigations apply to each component where you identified some threats. Lastly, validate the findings (threats and vulnerabilities) and apply mitigations.
Rapid Threat Model Prototyping Steps
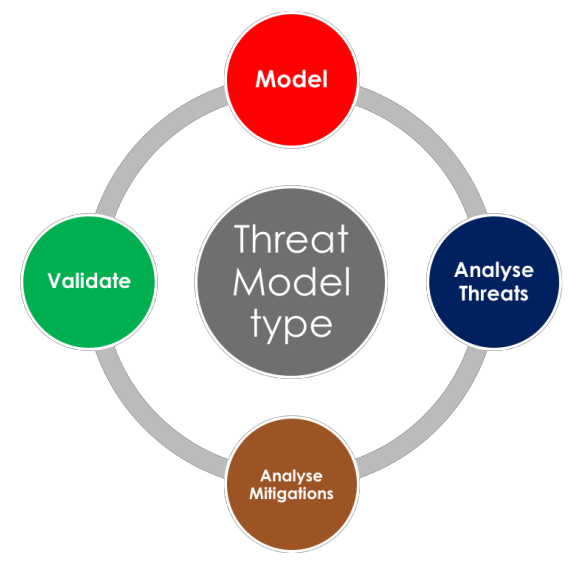
There are only 4 steps you need to apply when using this methodology: model, analyze threats, analyze mitigations and validate.
Step 1: Model the system
If there is no diagram for the system design you want to analyze, create one and include the basic flows (showing the direction of execution) and processes, the sources (where the flow starts) and the sinks (where the data is stored/ done processing it). Next represent the zones of trust by using the following convention:
- zone 0: elements outside of control (external/ anonymous users, other systems)
- zone 1: boundary zones between trusted and untrusted (such as DMZ elements)
- zone > 1: the more critical the systems, the higher the assigned zone
Lastly, assign to sources the lowest zone of trust, to sinks the highest zone of trust and to flows the origin zone of trust.
Step 2: Analyze threats using STRIDE and the default analysis rules
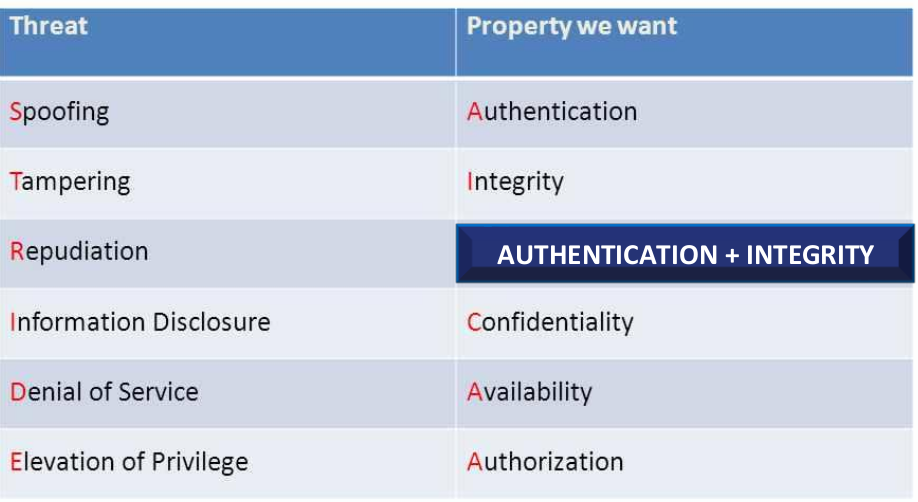
Use the STRIDE framework (see the following table) and the following rules to identify threats:
- elevation of privilege rule – start with this one; where there is a positive difference between the destination zone of trust and the source one, place “E” on the destination process (the flow is towards a more critical system so authorization is needed in place)
- spoofing rule: place “S” on the destination process where the origin has zone of trust 0 (the origin is a zone outside of control so authentication is needed)
- tampering rule: place “T” on connnecting flows where there is a positive difference between the destination zone of trust and the source one (data can be tampered in transit from source to destination, integrity is needed)
- repudiation rule: place “R” on destination where there is a “T” on the flow and a “S” on the destination (data is tampered in transit and repudiated afterwards, integrity and authentication is needed)
- information disclosure: place “I” on destination where there is a negative difference between the destination zone of trust and the source one (data from a more sensitive system is sent to a less sensitive system, confidentiality is needed) denial of service rule: place “D” on destination where the source is zone 0 (no control over the source actions, availability is needed)
Step 3: Analyze vulnerabilities and mitigations using OWASP Top 10
Use the OWASP Top 10 mapped to STRIDE to identify what vulnerabilities apply to the threats you found and what mitigations can be applied. Each vulnerability in OWASP has 2 STRIDE elements associated, where the first one is the most critical for that vulnerability, the last one having the lowest importance. For each of the identified STRIDE threats at the previous step, look in this table and check which of the vulnerabilities it implies, which of them are critical and which less.

Step 4: Validate
Validate the last 2 steps, by verifying if the identified STRIDE threats indeed apply where you found them and by verifying that the corresponding OWASP vulnerabilities apply for those situations. For those that do apply, check OWASP documentation for possible mitigations for each situation.
Conclusions and other considerations
The Rapid Threat Model Prototyping is easy to use and gives shape to the threat modeling process that so many people find difficult to apply. Here are a few more things you should consider when applying this methodology: apply at least one mitigation for each vulnerability found, keep a backlog for all the vulnerabilities identified and use RTMP as part of your Agile methodology, by designing most of it within the system functionality in sprint 0 and then by adding threat modeling data iteratively with each sprint, only for the functionality implemented during that sprint.